Changing the look of the login page is probably one of the things we first need to do when setting up a new WordPress website. In this tutorial we will present some simple ways to customize WordPress login page logo and form. There are some cool plugins to use too!
By default, every WordPress login page includes WordPress logo right above the login form and a pre-defined form style. There are plenty of reasons for us to change the login page:
- Creating a professional branded website;
- reinforcing current website branding;
- or just because we want to give it a more personal touch.
WordPress offers us hooks (functions) that allow us to hook into WordPress and call specific functions during page cycle. Hooks are used to manipulate the behavior of the platform without touching the source code. There are 2 types of hooks in WordPress: Filter and Action.
- Filters
Used to modify the content generated by WordPress tags. - Actions
Used to perform actions when certain events occur in WordPress on page cycle during which we can add our own functionalities.
Changing the login screen requires using 3 specific hooks:
- login_head to add our CSS to the head of the login page.
- login_headerurl to change the URL of the login logo.
- login_headertitle to change the title of the logo link.
Changing the logo
Option #1
Replace the logo using file functions.php
To change the WordPress logo (on the login screen) we need to use the login_head filter and link it to a function that injects some CSS code to replace the default trademark logo by your own image. Add the following PHP code anywhere in your functions.php file.
/**
* Custom admin login logo
*/
add_action( 'login_head', 'new_login_logo' );
function new_login_logo() {
echo '';
}
The H1 style that formats the WordPress logo is set to 320x80 and the logo image is 80x80 pixels, yet it’s likely your logo is of a different size so you'll need to override the background size and height of the "h1 a" tag to the dimensions of your logo.
By adding !important we can override any existing style.
To make this work, an image must exist in folder wp-content/themes/THEMENAME/images/my_logo_image.png.
Option #2
Replace the logo changing wp-admin.min.css using FTP cPanel
For this alternative method let's start by logging into WordPress site's admin panel.
- In WP Admin, go to Media > Add New.
- Upload the new logo and copy its direct link.
- Log into your website's cPanel and navigate to the File Manager.
- Open the file manager and navigate to the folder wp-admin/cs
- Open CSS file wp-admin.min.css.
- Locate style class .login h1 a
- Set the background image to your new logo, by pasting the copied URL:
background-image: url('http://link_to_your_logo.png');

Customizing the Login Form
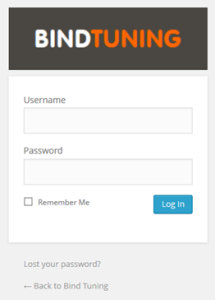
This is the default structure of the login screen:

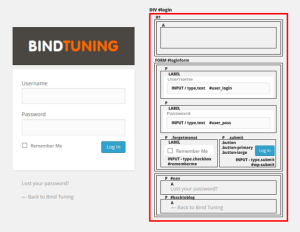
Before starting customizing the login form, it's very important that we fully understand the structure of the login screen, namely ID’s and classes used in this page. As an example, targeting #login would allow setting a custom background to the entire page.
Understanding this structure and how HTML elements are nested or stacked is important before you can add your own CSS rules. The above image will help you understand this structure in detail.
All the following code should be placed in the themes function.php.
#1 Change logo title and hyperlink
In the first place, let´s edit some properties related to the logo:
- Edit the title, on mouse over.
- Edit logo hyperlink.
For this we need to use the login_headertitle and login_headerurl filters to return, blog name for the title and root website URL for the hyperlink.
/**
 * Edit the title
 */
add_filter( 'login_headertitle', 'new_login_title' );
function new_login_title() {
     return get_option('blogname');
}

/**
 * Edit hyperlink
 */
add_filter( 'login_headerurl', 'new_login_url' );
function new_login_url() {
     return home_url( '/' );
}
#2 Add a background color or image
Changing the background color or even adding a background image to the login page can also be a great way to customize the login window. The CSS below can be added to our existing new_login_logo function above the .login h1 a class.
body {
     background-color:#FFF !important;
     /* IF YOU USE A BACKGROUND IMAGE
     background-image:url('.get_template_directory_uri().'/images/my_logo_image.png) !important;
     background-position:top !important;
     background-repeat:no-repeat !important;
     */
}
#3 Change the login form colors
The default WordPress login form has a white background and grey text but we want our form to have custom colors on text. This can be done by adding the following CSS:
#loginform {
     background-color:#4A4742;
}

.login label {
     color:#FFF;
}
#4 Change the login button style
The following styles can be used to change the blue gradient, border and hover styles of the login button. The light blue highlight on the button can also be targeted using inset box-style and -webkit-box-shadow. In the example below, the login button is changed to an orange using the following CSS.
.login .button-primary {
     background-image:none !important;
     background-color:#FF6600 !important;
     border:1px solid #666666 !important;
     -webkit-box-shadow: inset 0 1px 0 #888 !important;
     box-shadow: inset 0 1px 0 #888888 !important;
}

.login .button-primary:hover {
     background-color:#757580 !important;
}
#5 Hide the forgot password and back links
If you don’t use the forgotten password or back to homepage links at the bottom of the login page, you might hide them. This is possible using the following CSS code:
#backtoblog {
     display:none;
}

#nav {
     display:none;
}
Our function will look like this:
/**
* Custom admin login logo
*/
add_action( 'login_head', 'new_login_logo' );
function new_login_logo() {
echo '';
}
Useful plugins
To finalize, we leave you with a list of some great plugins, which can be very useful when customizing the login screen:


